
The beginner’s complete guide to building a hiking first aid kit — with a full checklist, honest gear picks at every budget, and step-by-step instructions for treating the injuries you’ll actually encounter.
Key Takeaways
- A complete beginner hiking first aid kit weighs under 1 lb and costs $20–50 — there’s no reason to hike without one
- Blisters are the #1 trail injury for beginners; moleskin applied at the first sign of a hot spot prevents 90% of blister problems before they start
- For sprained ankles, use the RICE method: Rest, Ice (or cold water), Compression, Elevation — and know when it’s serious enough to stop hiking
- The American Red Cross recommends every hiker carry a basic first aid kit and know how to use its contents — having the kit and not knowing how to use it is only half the preparation
- Pre-made kits ($25–50) are the easiest starting point for beginners; DIY kits cost less but require more knowledge to assemble correctly
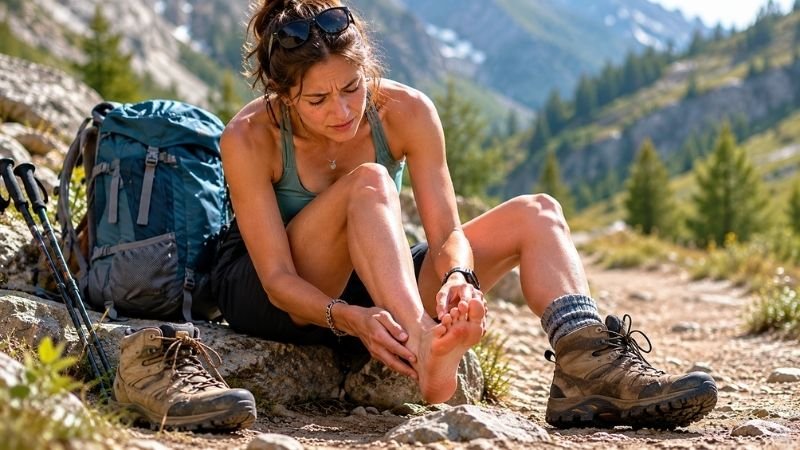
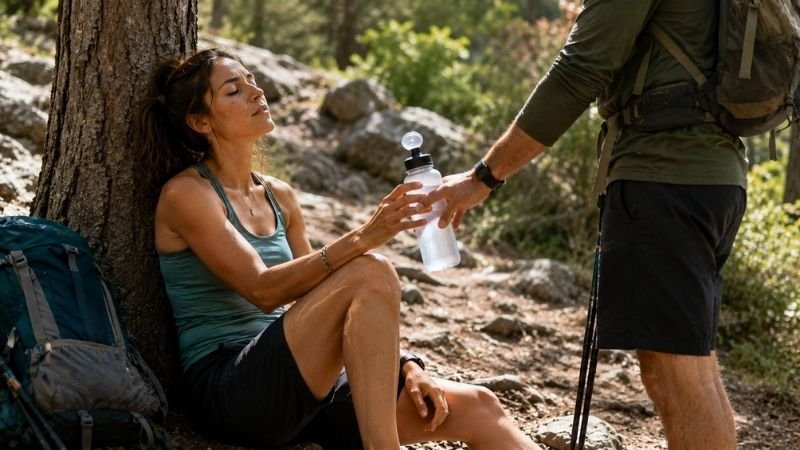
It’s mile 4 of your first real hike. Your foot has been feeling a little rubby for the past 20 minutes but you’ve been ignoring it, because the view ahead looks incredible and you don’t want to be the person who stops. Then you take your boot off at the summit and realize: full blister, the size of a quarter, on your heel.
You reach for your pack. You have two water bottles, three granola bars, a rain jacket, and absolutely nothing to put on a blister.
The hike back is memorable in all the wrong ways.
This scenario — some version of it — happens to almost every beginner hiker at least once. Not because they were reckless, but because nobody told them that a hiking first aid kit isn’t optional gear. It’s the thing that stands between a minor inconvenience and a miserable two-mile limp back to the parking lot.
This guide gives you the complete picture: what goes in a hiking first aid kit, whether to buy one or build your own, and how to actually handle the five most common trail injuries — so the next time something happens, you know exactly what to do.
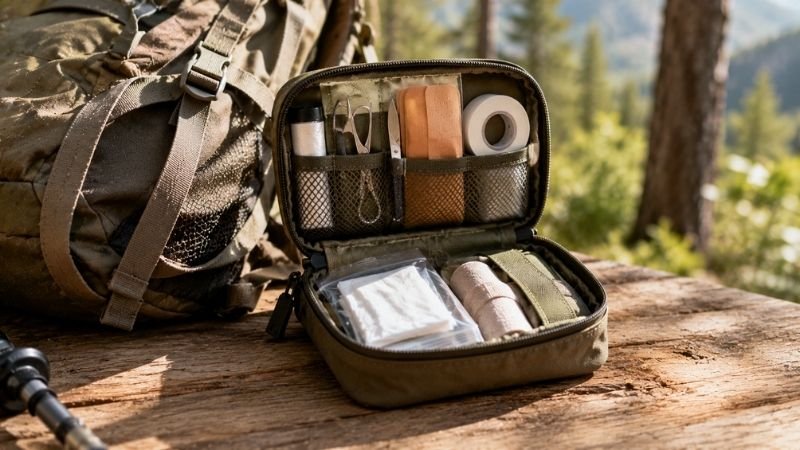
What Should Be in a Hiking First Aid Kit? The Complete Checklist
A good hiking first aid kit for beginners covers three categories: wound care, medications, and tools. Here’s everything that belongs in it, organized for easy reference on trail.
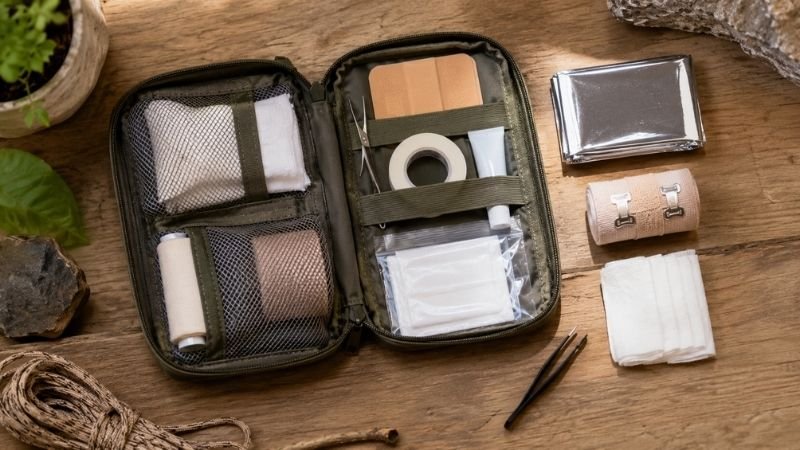
Wound Care Essentials
- Adhesive bandages — various sizes (small, medium, knuckle, fingertip). The most-used item in any kit.
- Moleskin or blister pads — the single most important item for beginner hikers. More on this below.
- Sterile gauze pads — 2×2 and 3×3 inch sizes for larger wounds
- Medical tape — secures gauze, reinforces moleskin, improvises splint padding
- Butterfly closures — close deeper cuts that won’t stop bleeding with pressure alone
- Elastic bandage (ACE wrap) — for compression on sprains and strains
- Antiseptic wipes — clean wounds before bandaging
- Triple antibiotic ointment packets — prevent infection on cuts and scrapes
- Sterile saline — flush debris from wounds and eyes; more effective than water alone
- Nitrile gloves — protect you when treating others; always include at least 2 pairs
Medications
- Ibuprofen (Advil) — pain relief and anti-inflammatory, particularly useful for sprains
- Acetaminophen (Tylenol) — pain and fever management, gentler on the stomach
- Antihistamine (Benadryl or generic) — for allergic reactions to insect stings or plant contact; one of the most underrated kit items
- Antacid tablets — stomach issues on trail are more common than most people expect
- Electrolyte packets — replace salts lost through sweat; prevent cramping and early dehydration
- Any personal prescription medications — especially EpiPen if you have known severe allergies
Tools
- Tweezers — remove splinters, thorns, and embedded debris
- Medical scissors or trauma shears — cut clothing away from injuries, cut moleskin to size
- Emergency blanket — prevents hypothermia if you’re stuck out after dark or in wet conditions; weighs almost nothing
- CPR face shield — compact, lightweight, and worth having
- Small flashlight or headlamp — if not already in your main pack
- Whistle — signal for help when voice isn’t enough
- First aid reference card — a laminated quick-reference guide; panic is real, and having instructions in your hands helps
Editor’s note: The antihistamine is the most commonly overlooked item in pre-made kits. Most kits don’t include it. If you’re buying a pre-made kit, check the contents and add antihistamines yourself if they’re missing — an allergic reaction miles from help is a genuine emergency.
Pre-Made Hiking First Aid Kit vs DIY: Which Is Right for Beginners?
This is the first real decision: spend $30–50 on a pre-made kit, or build your own from drugstore supplies for less?
Pre-made kit pros:
- Everything organized in a purpose-built case with labeled compartments
- No research required — it’s already assembled
- Comes with a first aid reference guide
- Compact and designed for a pack
Pre-made kit cons:
- More expensive than DIY for the same items
- Often missing antihistamines and electrolytes
- May include items you don’t need (for backcountry) or miss items you do
DIY kit pros:
- Significantly cheaper — a solid beginner kit costs $15–25 from a drugstore
- You choose exactly what goes in it
- You know what every item is and where it is
DIY kit cons:
- Requires research to get right
- Needs a case or bag to organize it
- Easy to forget important items if you’re not systematic
The honest recommendation for most beginners: Start with a pre-made kit in the $25–45 range, then supplement it with antihistamines and electrolyte packets. The Adventure Medical Kits Ultralight/Watertight .5 and the MyMedic Solo Kit are consistently recommended across hiking communities for beginner day hikers. Both weigh under 4 oz and have everything you need for short day hikes.
The 15-Minute Budget DIY Hiking First Aid Kit (Under $20)
If you want to build your own for your first few hikes, here’s the minimum viable kit from a drugstore:
- Box of assorted adhesive bandages — $3
- Moleskin sheet (Dr. Scholl’s) — $5
- Small roll of medical tape — $2
- Antibiotic ointment packets — $3
- Ibuprofen travel pack — $2
- Antihistamine (Benadryl generic) — $3
- Nitrile gloves (2 pairs) — $2
- Emergency blanket — $3
- Total: ~$23
Put everything in a small ziplock bag or a pencil case. It’s not pretty, but it works for short, well-trafficked trails.
How to Treat the 5 Most Common Hiking Injuries
Owning a first aid kit is only half the preparation. The American Red Cross emphasizes that knowing how to use your kit is as important as having the right supplies. Here’s what you actually need to know for the injuries you’ll most likely encounter.
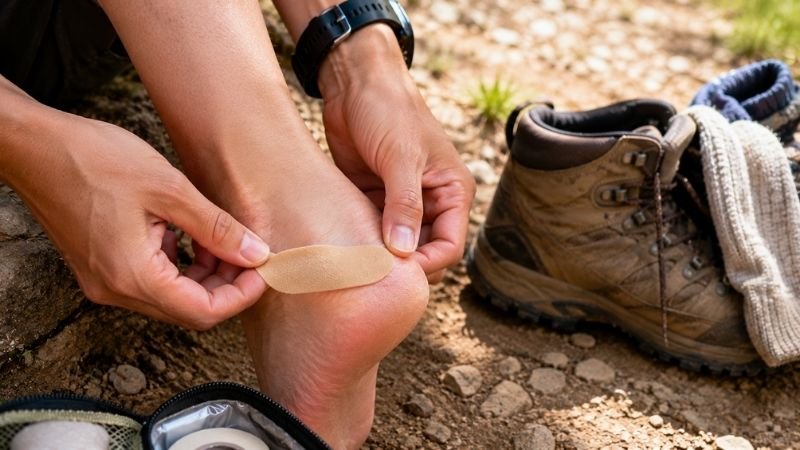
1. Blister Treatment on the Trail
Blisters are by far the most common beginner hiking injury — caused by friction between skin and footwear, especially on new or poorly fitting shoes, or in cotton socks that hold moisture.
Prevention (the best treatment):
- Wear merino wool or synthetic socks, never cotton
- Make sure your shoes are broken in before long hikes
- At the first sign of a “hot spot” (an area of warmth and friction), stop and address it immediately
If a hot spot appears but no blister yet: Apply moleskin directly over the hot spot. Cut the moleskin slightly larger than the irritated area and press firmly. This is the most effective intervention — addressing it before the blister forms prevents it from forming at all.
If a blister has already formed: Do not pop it if you can avoid it. The skin over an intact blister is protecting the wound underneath. Apply a “donut” of moleskin — cut a hole in the center of a piece of moleskin that’s sized to the blister, so the donut surrounds the blister without pressing on it, then cover with a bandage.
If the blister has burst: Clean the area with an antiseptic wipe. Apply antibiotic ointment. Cover with a bandage or non-stick gauze pad and secure with medical tape. Monitor for signs of infection (increasing redness, warmth, pus) in the days following.
2. Sprained Ankle Hiking: The RICE Method
Sprained ankles are the second most common trail injury, typically from stepping on uneven terrain or loose rocks. They range from minor (tender but walkable) to severe (significant swelling, inability to bear weight).
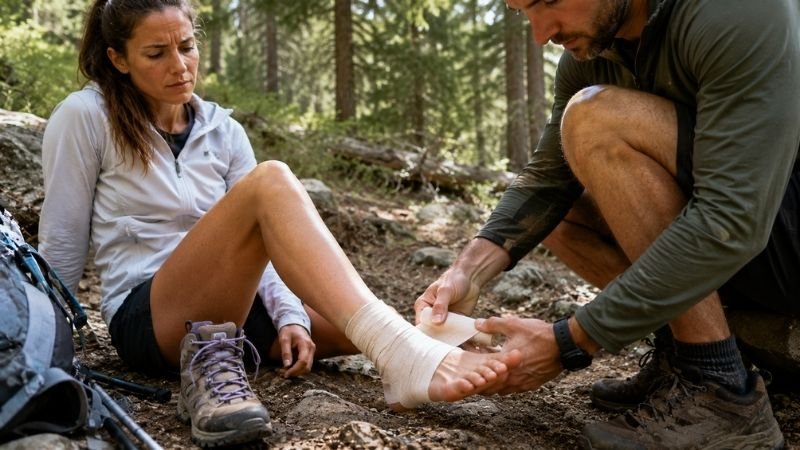
Immediate treatment — RICE:
- Rest: Stop moving immediately. Don’t try to walk it off.
- Ice (or cold substitute): You don’t have ice on trail, but cold stream water, a cold wet bandana, or even a cold water bottle pressed against the ankle reduces swelling. Apply for 15–20 minutes.
- Compression: Wrap the ankle with your elastic bandage. Snug but not tight — you should be able to slide a finger under the wrap.
- Elevation: Rest with the foot elevated above heart level when possible.
After RICE — can you continue hiking? If the pain is manageable and you can bear weight without significant pain, slowly walking on a wrapped ankle is often possible. Take ibuprofen to reduce inflammation. Use trekking poles for stability if available.
When to stop and get help:
- Unable to bear weight at all
- Significant deformity or bone prominence visible
- Severe swelling within minutes of the injury
- Numbness or tingling in the foot
A study published in the British Journal of Sports Medicine found that the RICE method significantly reduces swelling and recovery time for mild to moderate ankle sprains when applied promptly. Prompt treatment on trail translates directly to better outcomes.
3. Heat Exhaustion Hiking: Recognize and Respond
Heat exhaustion is what happens when your body can no longer keep itself cool — typically from a combination of physical exertion, heat, humidity, and inadequate hydration. It’s more common than most beginners realize, and it can escalate to heat stroke (a life-threatening emergency) if untreated.
Signs of heat exhaustion:
- Heavy sweating despite feeling hot
- Cool, pale, damp skin
- Weakness, dizziness, or nausea
- Headache and muscle cramps
- Fast, weak pulse
Treatment:
- Stop hiking immediately and move to shade
- Lie down and elevate the feet slightly
- Drink water with electrolytes (not just plain water)
- Remove or loosen tight clothing
- Apply cool, wet cloth to forehead, neck, and wrists
- Rest for at least 30–60 minutes before considering moving
When it becomes an emergency (heat stroke): Heat stroke is different — the body’s temperature regulation has failed. Signs: hot, dry (not sweating) skin, confusion or altered mental state, rapid strong pulse. This is a medical emergency. Call 911 if you have signal, activate a PLB if available, and cool the person as rapidly as possible while waiting for help.
The CDC notes that heat stroke is fatal if not treated promptly. Do not attempt to hike out with someone showing heat stroke signs — get emergency help immediately.
4. Dehydration on the Trail: Early Signs Matter
Dehydration is one of the most preventable hiking problems, and one of the most commonly ignored until it’s a real issue. By the time you feel thirsty, you’re already mildly dehydrated.
Early signs (manageable on trail):
- Thirst (late indicator — don’t wait for this)
- Dark yellow urine
- Dry mouth
- Mild headache or fatigue
Treatment: Drink water with electrolytes. Rest in shade. Eat a small salty snack to help water retention. Pace recovery over 30–60 minutes.
Moderate to severe signs (reduce activity, consider evacuating):
- Very dark or no urine output
- Dizziness when standing
- Confusion or unusual irritability
- Rapid heartbeat
Prevention: Drink 500ml (about 16oz) per hour of hiking, more in heat. Don’t wait until you’re thirsty. Electrolyte packets in your kit make a significant difference on hot days — plain water alone doesn’t replace what you lose through sweat.
5. Cuts and Scrapes: Wound Care on the Trail
Falls on rocky or root-covered trails produce cuts and scrapes with remarkable frequency. Most are minor; the goal is to prevent infection rather than perform surgery.
Treatment:
- Control any bleeding with direct pressure using a clean gauze pad
- Once bleeding stops, flush the wound with sterile saline or clean water — removing debris is the most important step
- Apply antibiotic ointment
- Cover with an appropriately sized bandage or gauze secured with medical tape
- Check daily for signs of infection
Signs a wound needs medical attention:
- Won’t stop bleeding after 10 minutes of firm pressure
- Very deep, jagged, or gaping wound that won’t stay closed with butterfly strips
- Signs of infection (increasing redness, warmth, swelling, pus) in the 24–48 hours following
How Much Does a Hiking First Aid Kit Weigh?
Weight matters in hiking, and this is a common concern for beginners who are already thinking about pack weight. The good news: a complete beginner hiking first aid kit is lighter than most people expect.
- Ultralight pre-made kit (Adventure Medical Kits .5): 2.7 oz / 76g
- Standard beginner pre-made kit (MyMedic Solo): 8 oz / 227g
- DIY drugstore kit in ziplock: approximately 5–6 oz depending on items
For most day hikers: a kit in the 4–8 oz range covers everything you need without meaningful weight penalty. Store it in an outer pocket of your daypack — not buried at the bottom — so it’s accessible in the 30 seconds after an injury when you need it fast.
When to Stop Hiking and Get Emergency Help
Most trail injuries are manageable with basic first aid. But there are situations that require stopping immediately and calling for emergency assistance:
Call for help immediately if anyone experiences:
- Chest pain or pressure
- Difficulty breathing that doesn’t improve with rest
- Signs of heat stroke (confusion, hot dry skin, rapid pulse)
- Severe allergic reaction (throat swelling, difficulty breathing, widespread hives)
- Suspected broken bone with deformity
- Severe head injury from a fall
- Snake or spider bite with systemic symptoms (nausea, swelling spreading beyond bite, difficulty breathing)
- Any situation where the person cannot walk out safely
In areas with cell service: Call 911 Without cell service: Activate a personal locator beacon (PLB) or satellite communicator if you have one. Send someone in your group for help. Stay with the injured person.
This is why telling someone your hiking plan before you go is essential — it ensures that if something goes wrong and you can’t call for help, someone knows where to look.
If You Only Have 10 Minutes: The Minimum Viable Kit
No time to research? Here’s the absolute minimum to carry on any hike over 2 hours, assembled in 10 minutes from a drugstore:
- Moleskin sheet
- 6 assorted adhesive bandages
- Antibiotic ointment packets (3)
- Ibuprofen travel pack
- Antihistamine (Benadryl or generic)
- Emergency blanket
- 1 pair nitrile gloves
Total weight: under 3 oz. Total cost: under $15. Takes 10 minutes to assemble and fits in a small ziplock bag.
It’s not comprehensive, but it handles 90% of what actually happens on beginner day trails.
FAQ: Real Questions About Hiking First Aid
Q: Do I need a first aid kit for a short hike? Yes, even for hikes under 2 hours. Blisters, cuts, and sprained ankles don’t wait for long hikes. A lightweight kit adds almost nothing to your pack weight and covers the injuries that are most likely to happen on any hike regardless of distance.
Q: Should I buy a pre-made hiking first aid kit or build my own? For beginners: buy a pre-made kit and add antihistamines and electrolyte packets. DIY kits are cheaper but require more knowledge to assemble correctly. Once you’ve hiked enough to know what you actually use, you can refine a custom kit based on your real experience.
Q: How do I treat a blister on the trail? If a hot spot appears but no blister yet: apply moleskin immediately. If a blister has formed: do not pop it — apply a moleskin donut around it. If it’s already burst: clean with antiseptic, apply antibiotic ointment, cover with a bandage, and monitor for infection.
Q: What do I do if someone has heat exhaustion hiking? Stop immediately, move to shade, have them lie down, elevate feet, drink water with electrolytes, and apply cool wet cloth to neck and forehead. Rest for 30–60 minutes before moving. If symptoms worsen or they become confused — escalate to emergency services, as this may be heat stroke.
Q: How often should I replace items in my hiking first aid kit? Check your kit at least once a year. Replace any items that are expired (medications, antiseptics), used, or damaged. Pay special attention to medication expiration dates — expired medications may be less effective when you need them most.
Pack It Before You Need It
The only thing worse than needing a first aid kit and not having one is having one but not knowing how to use it. This guide gives you both pieces: what to carry and what to do when the moment comes.
Start with a basic pre-made kit. Add antihistamines. Learn the RICE method for ankle sprains and the moleskin-first approach for blisters. That combination covers the vast majority of what actually happens on beginner trails.
The best hiking first aid kit is the one that’s actually in your pack.
Build out your complete beginner hiking setup:
- The Complete Hiking Packing List for Beginners
- Outdoor Safety for Beginners
- Hiking for Beginners: Everything You Need to Know
References
- American Red Cross. Hiking and Backpacking First Aid Kit Checklist. redcross.org
- Centers for Disease Control and Prevention (CDC). Heat Stress — Heat Related Illness. cdc.gov
- van Rijn, R.M., et al. (2007). What is the clinical course of acute ankle sprains? British Journal of Sports Medicine, 41(1), 1–13.
- REI Co-op. How to Choose or Build a First Aid Kit. rei.com/learn/expert-advice/firstaid-kits.html
- Washington Trails Association. How to Build a Hiker’s First Aid Kit. wta.org
- Wilderness Medical Society. Wilderness First Aid Guidelines. wms.org