
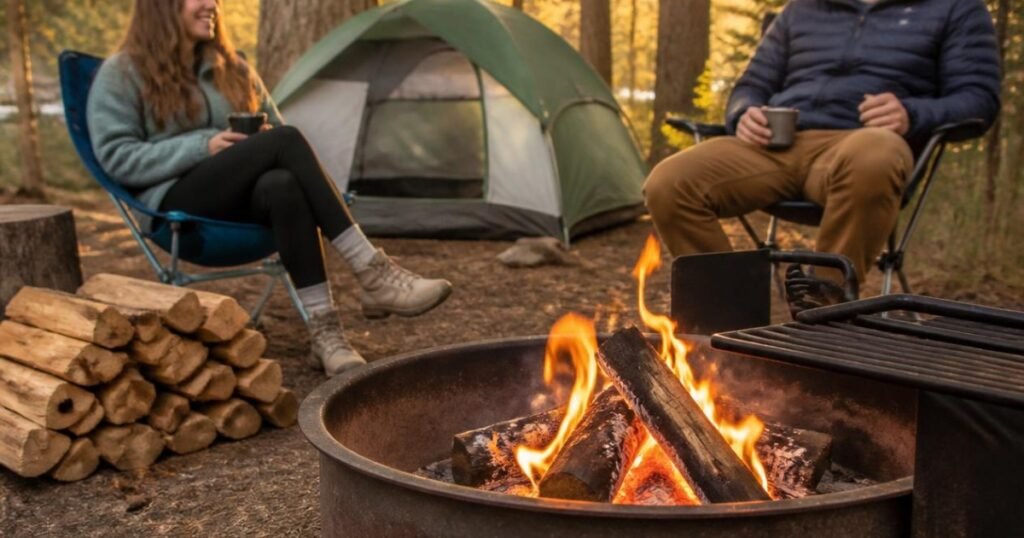
Building your first campfire can feel harder than it looks. Maybe you’ve watched someone light one in minutes, only to end up with a smoky pile of sticks that burns out almost as quickly as it starts. The good news? Learning how to build a campfire isn’t about luck or survival expertise—it’s about using the right materials, choosing a simple fire structure, and giving the fire enough airflow to grow.
In this beginner-friendly guide, you’ll learn how to build a campfire safely from start to finish, including how to choose the best fire setup, keep it burning with less smoke, and put it out properly when you’re done. With a few simple techniques, you’ll be able to build a fire that keeps you warm, cooks your meals, and makes every camping trip more enjoyable.
Overview: The 60-Second Answer
A successful campfire comes down to three fuel sizes (tinder, kindling, fuel wood), one solid structure, and good airflow. Skip any of these, and even expert-level fire-starting gear won’t save you.
Here’s the quick-start version before we go step by step:
- Check local fire regulations before collecting a single stick.
- Gather three fuel sizes: tinder, kindling, and fuel wood — more than you think you need.
- Pick a fire structure that matches your goal (fast heat, cooking, long burn, or windy conditions).
- Light the tinder first, then feed the fire gradually as it grows.
- Maintain airflow and resist the urge to keep poking it.
- Extinguish completely using the douse, stir, and feel method.
That’s the whole formula. Everything below simply breaks each step down so you’re not guessing in the dark — literally.
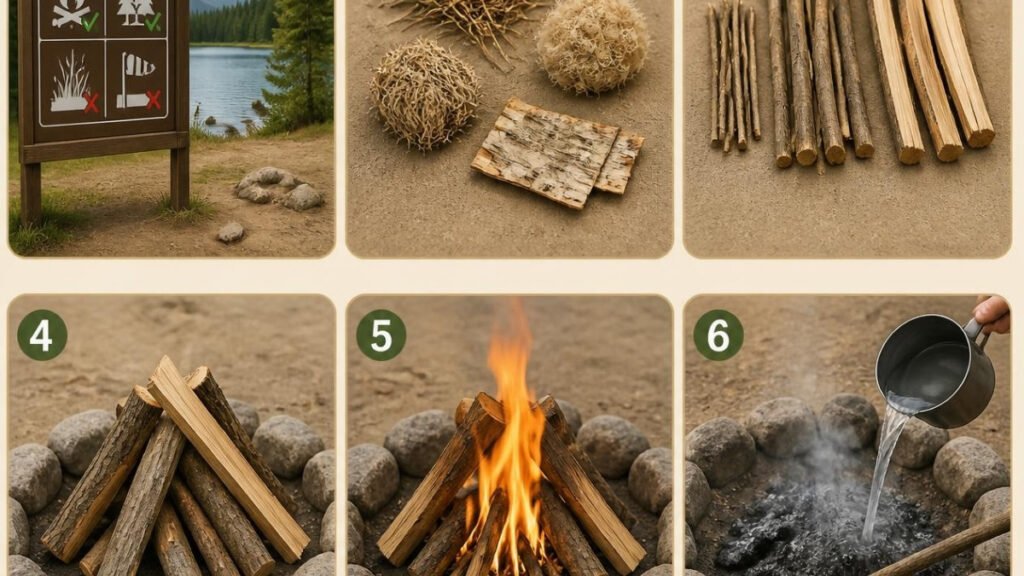
Step 1 — Make Sure It’s Safe to Build a Fire
Before you gather a single piece of wood, confirm you’re actually allowed to light a fire where you are. Skipping this step is one of the most common — and most avoidable — mistakes new campers make.
Fire rules change constantly depending on location, season, and drought conditions. What was fine last summer might be banned this summer. A quick check of local fire restrictions, whether through a park website, campground office, or ranger station, takes two minutes and saves you from an awkward conversation with a park ranger (or worse, a fine).
Campgrounds vs Backcountry vs Backyard
Each setting has different expectations:
- Campgrounds usually provide a designated fire ring — use it, and don’t build a separate fire elsewhere on the site.
- Backcountry sites often require you to use existing fire rings only, and many wilderness areas ban open fires entirely during dry seasons.
- Backyards typically fall under local municipal rules, which can be stricter than you’d expect, especially in suburban areas.
When You Should Skip the Campfire Completely
Skip it when there’s a burn ban in effect, when wind speeds are high, when the ground is extremely dry, or when you’re camping somewhere without a safe, cleared spot to build one.
| Location | Campfires Typically Allowed? | Notes |
|---|---|---|
| Established campground fire ring | Yes | Confirm no active burn ban |
| Backcountry (undesignated) | Often no | Check permit rules first |
| National forest during fire season | Often restricted | Regulations shift quickly |
| Backyard (residential) | Depends on city ordinance | Check local burn laws |
| Beach (with permit) | Sometimes | Below high-tide line, contained |
Gather a whole armful of wood first, only to discover once they’re ready to light up that fires aren’t allowed at all that day. Checking the rules first, not last, saves you the disappointment — and the wasted effort.
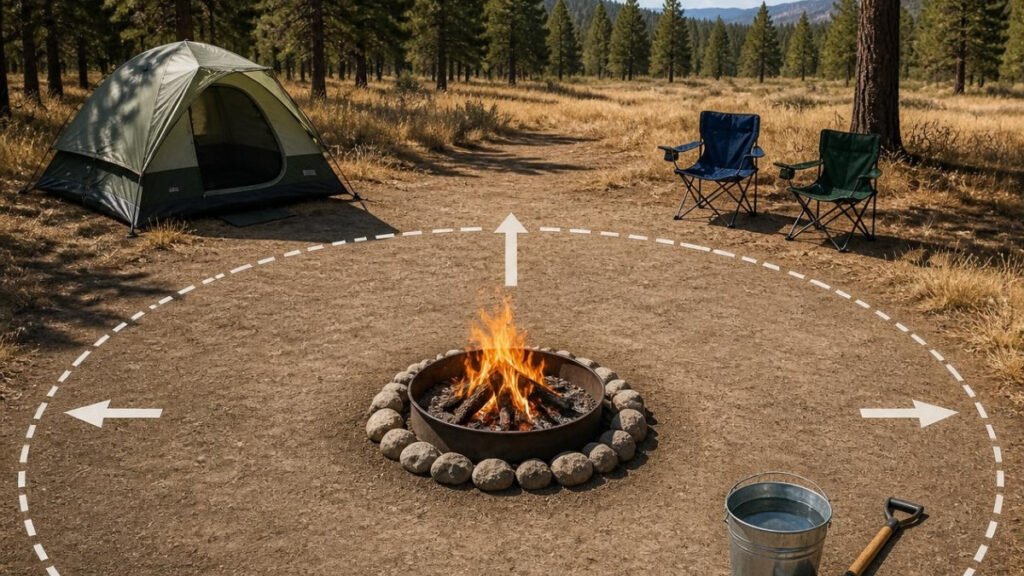
Once you know a fire is allowed, think about placement. Keep your fire at least 10-15 feet from tents, dry brush, overhanging branches, and anything flammable. Pay attention to wind direction, since it will carry both smoke and sparks. And always follow Leave No Trace basics: use existing fire rings when possible, keep the fire small, and burn only what you’d naturally find on the ground, not live branches or full-size logs hacked off a tree.
One habit worth adopting early: buy your firewood where you’ll burn it. Transporting wood from home can introduce pests and tree diseases into new areas, which is a bigger deal for local ecosystems than most people realize.
If you’re still assembling the rest of your setup, our camping for beginners guide covers the broader basics of getting your first trip organized, and your camping packing list is a good place to double-check you haven’t forgotten fire-starting tools before you leave home.
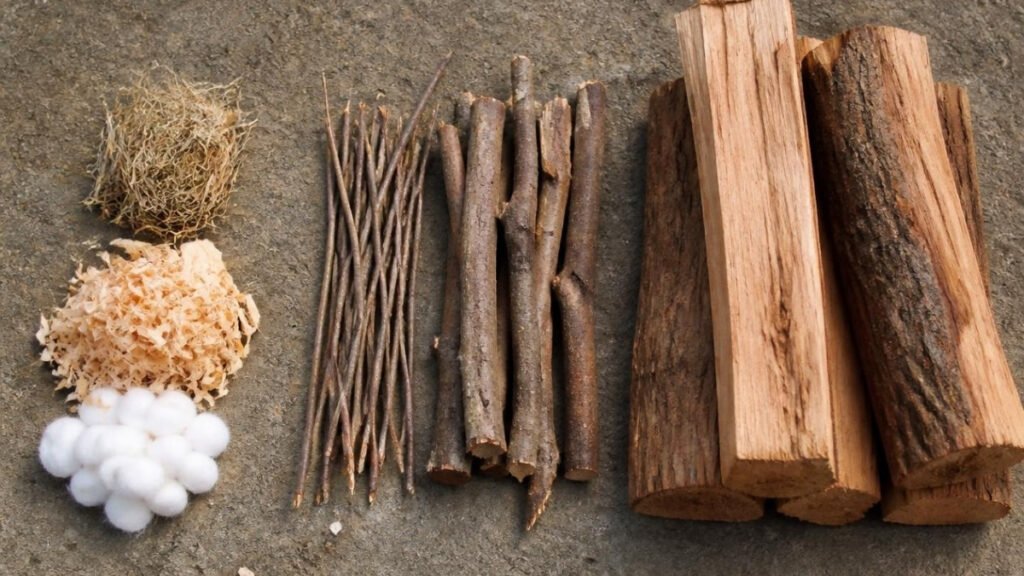
Step 2 — Understand the Three Types of Fire Fuel
Fires don’t fail because people pick the wrong lighter — they fail because people skip fuel sizes. Understanding tinder, kindling, and fuel wood is the single biggest lesson that separates confident fire-builders from frustrated ones.
Fire needs three ingredients to survive: heat, fuel, and oxygen — often called the fire triangle. Remove any one of them, and the fire goes out. Most beginner mistakes trace back to messing with the fuel or oxygen side of that triangle without realizing it.
Tinder Explained
Tinder is anything that catches fire almost instantly with just a spark or small flame. Think dry leaves, thin bark shavings, dry pine needles, or dryer lint. It burns fast and hot, but only for a few seconds — just long enough to ignite the next size up.
Kindling Explained
Kindling is the bridge between tinder and real fuel. These are small sticks, roughly the thickness of a pencil to a finger, that catch from the tinder’s brief flame and burn long enough to ignite bigger wood. This is the stage most beginners rush past, and it’s usually where the fire dies.
Fuel Wood Explained
Fuel wood is your main heat source — pieces roughly wrist-thick or larger. This is what keeps the fire burning for the long haul, once kindling has built up enough heat to sustain it.
| Fuel Type | Everyday Size Comparison | Purpose | Burn Time |
|---|---|---|---|
| Tinder | Shredded paper, cotton ball | Catches the first spark | Seconds |
| Kindling | Pencil to finger thickness | Builds sustainable flame | 1-3 minutes |
| Fuel Wood | Wrist to forearm thickness | Sustains long-term heat | 20+ minutes per log |
A practical tip that saves a lot of frustration: prepare roughly twice as much material as you think you’ll need, especially kindling. Running out mid-build means scrambling in the dark while your flame gutters out.
One of the most common mistakes beginners make is lighting the tinder before they’ve actually gathered or organized enough kindling. The tinder flares up fast, they realize they’re short on the next size, and by the time they’ve grabbed more sticks, the flame is gone. Get everything staged and within arm’s reach before you strike a single match.
Also worth knowing: dry, dead wood burns far better than green (living) wood, which holds moisture and produces more smoke than heat. Snap-test it — dry wood snaps cleanly with a crisp sound, while green wood bends or feels spongy.
Step 3 — Choose the Best Campfire Structure for Your Situation
Different structures solve different problems, so picking the right one for your situation makes the whole process easier.
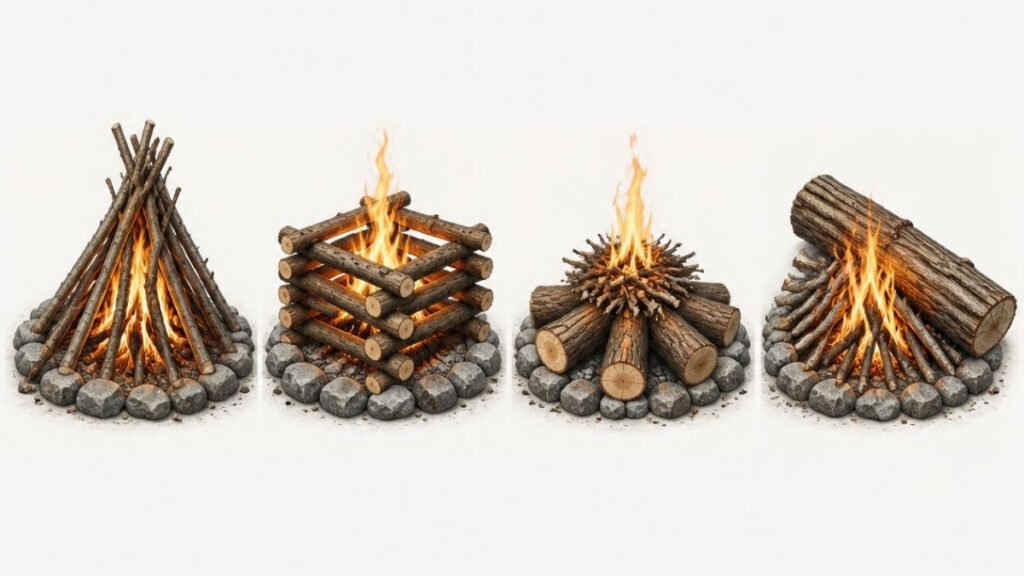
Teepee Fire (Best for Fast Ignition)
Lean kindling into a cone shape around your tinder, like a tiny teepee. This shape channels airflow upward through the center, which means it lights fast and burns hot early on. The tradeoff: it collapses quickly and needs more attention to keep going.
Log Cabin Fire (Best for Beginners and Cooking)
Stack fuel wood in a square, log-cabin style, with tinder and kindling inside the center. It burns steadily, creates a flat bed of coals that’s great for cooking, and is more forgiving if your first attempt at stacking isn’t perfect.
Upside-Down Fire (Best for Long-Lasting Fires)
Also called a top-down fire, this flips the usual order: largest logs on the bottom, kindling in the middle, tinder on top. It burns downward slowly, needs far less tending, and produces a long, steady burn — ideal for an evening you don’t want to keep rebuilding.
Lean-To Fire (Best for Windy Weather)
Push a long stick into the ground at an angle, then lean kindling against it, sheltering your tinder underneath from the wind. It’s not the prettiest structure, but it’s often the only one that reliably lights when conditions are gusty.
| Structure | Beginner Friendly | Cooking | Long Burn | Wind Resistance | Maintenance |
|---|---|---|---|---|---|
| Teepee | Moderate | Fair | Low | Poor | High |
| Log Cabin | High | Good | Moderate | Fair | Moderate |
| Upside-Down | High | Fair | High | Good | Low |
| Lean-To | Moderate | Poor | Low | High | Moderate |
Here’s something worth knowing before your first attempt: many experienced campers have actually moved away from the classic teepee fire and toward top-down (upside-down) fires. It’s less exciting to watch build, but it needs far less babysitting once it’s lit, which matters a lot when you’d rather be relaxing than constantly feeding flames.
For a deeper look at building a fire specifically for cooking, our campfire cooking guide covers the coal management side of things in more detail.
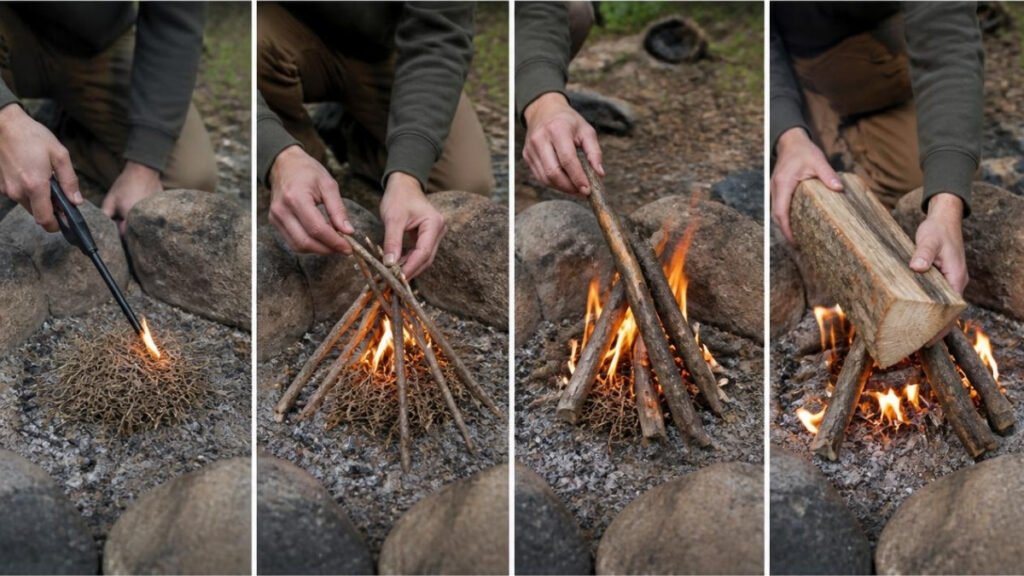
Step 4 — Light Your Campfire the Right Way
The first five minutes after you strike a match. Success comes down to patience, not rushing to build a bigger flame.
Start by lighting your tinder at its base from two or three small points if possible, giving the flame room to spread naturally. As the tinder catches, add small pieces of kindling a little at a time, leaving enough space between them for air to circulate. Once the kindling is burning with a steady flame instead of just smoldering, begin adding slightly larger sticks.
The first time I built a campfire, I made the mistake almost everyone makes—I tossed on a thick log as soon as I saw flames. Within seconds, the fire that looked promising was nothing but smoke. I didn’t realize that a young fire needs time to build heat before it can support larger wood. Ever since then, I’ve waited until the kindling is burning confidently before adding fuel logs, and the difference is remarkable.
A few gentle breaths aimed at the base of the fire can also help. Soft, steady airflow feeds the flame without scattering ash, while one hard blow can easily snuff out a young fire.
First Five Minutes Campfire Checklist:
- ☐ Tinder lit from multiple points at the base
- ☐ Kindling added in small amounts, not all at once
- ☐ Space left between pieces for airflow
- ☐ Flame confirmed steady before adding fuel wood
- ☐ Gentle, steady blowing — not one big gust
- ☐ No large logs added until coals have formed
Adding a single large log too early. It looks harmless, but a big piece of wood absorbs heat rather than catching it, and it can smother a young flame before it has any real coal base to work with. Wait until you have a small, glowing coal bed before reaching for the bigger pieces.
💡 Quick Tip
Gather all your tinder, kindling, and fuel wood before striking your first match. Walking away to collect more wood halfway through is one of the quickest ways to lose a young fire.
Step 5 — Maintain a Strong, Steady Campfire
Once your fire is established, the goal shifts from getting it lit to keeping it stable. At this point, the biggest difference comes from small habits rather than bigger flames. A well-managed fire burns hotter, produces less smoke, and needs surprisingly little attention.
Build a Strong Coal Bed
A glowing bed of coals—not the flames themselves—is what keeps a campfire burning for hours. Coals store steady heat and ignite new logs much more effectively than open flames alone. Add one piece of fuel wood at a time, allowing each log to catch before adding the next. With a little patience, the coals will do most of the work for you.
One thing I didn’t appreciate on my first few camping trips was how valuable a good coal bed really is. I used to focus on keeping the flames as tall as possible, thinking bigger flames meant a better fire. Instead, I ended up adding wood too often and creating more smoke than heat. Once I learned to let the coals build naturally, the fire became much easier to manage—and I stopped feeding it every few minutes.
Resist the Urge to Keep Poking the Fire
Almost every beginner reaches for a stick the moment the flames settle down. In reality, constant poking usually makes things worse. It breaks apart the hot coal bed, releases stored heat, and interrupts the airflow that was keeping the fire burning efficiently. Unless you’re repositioning a log, it’s usually better to leave the fire alone.
Read the Fire Before You Add More Wood
Instead of adding logs on a schedule, let the fire tell you what it needs.
| What You See | What It Usually Means |
|---|---|
| Bright orange-yellow flames with glowing coals | The fire is healthy—keep doing what you’re doing. |
| Thick white or gray smoke | The wood may be damp, stacked too tightly, or lacking airflow. |
| Flames shrinking but coals still glowing | A good time to add one new log. |
| Large flames but very few coals | Slow down and let the fire burn before adding more wood. |
Campfire cooking works best over a wide, even bed of glowing coals rather than tall flames. Steady heat cooks food more evenly, reduces the risk of burning, and gives you far better control over the cooking process.
💡 Quick Tip
Resist the urge to add another log just because the flames look smaller. If the coals are still glowing bright orange, your fire has plenty of heat left.
Step 6 — Wet Wood? Here’s How to Start a Fire Anyway
Damp wood is one of the most common real-world obstacles campers run into, and it’s rarely mentioned in the “ideal conditions” version of fire-building advice. Here’s how to work around it.
Start by identifying which wood is actually damp versus just cold. Wood that feels heavy, smells musty, or doesn’t snap cleanly when bent is likely holding moisture. The fix isn’t to avoid it entirely — it’s to get past the wet exterior.
Rainy Weather Tips
Split larger pieces open with a hatchet or knife to expose the dry interior wood, since moisture typically only penetrates the outer layer. Look for dead branches still attached to standing trees rather than wood lying on the ground, since ground-level wood absorbs far more moisture from soil contact.
Wet Wood Survival Tricks
Increase your kindling quantity beyond what you’d normally use — wet conditions mean more of it will fail to catch on the first try. A top-down (upside-down) structure tends to perform better in damp conditions too, since it shields lower fuel from direct rain exposure longer.
Wet Wood Recovery Checklist:
- ☐ Split larger logs to expose dry interior wood
- ☐ Collect dead branches still on standing trees, not the ground
- ☐ Double your usual kindling amount
- ☐ Use extra tinder from a dry, packed source if available
- ☐ Build a top-down structure for extra protection from moisture
- ☐ Accept that ignition will take longer — don’t rush it
Campground firewood, even when purchased, isn’t always as dry as it looks on the outside. A quick split test before you rely on it can save you a frustrating half hour later.
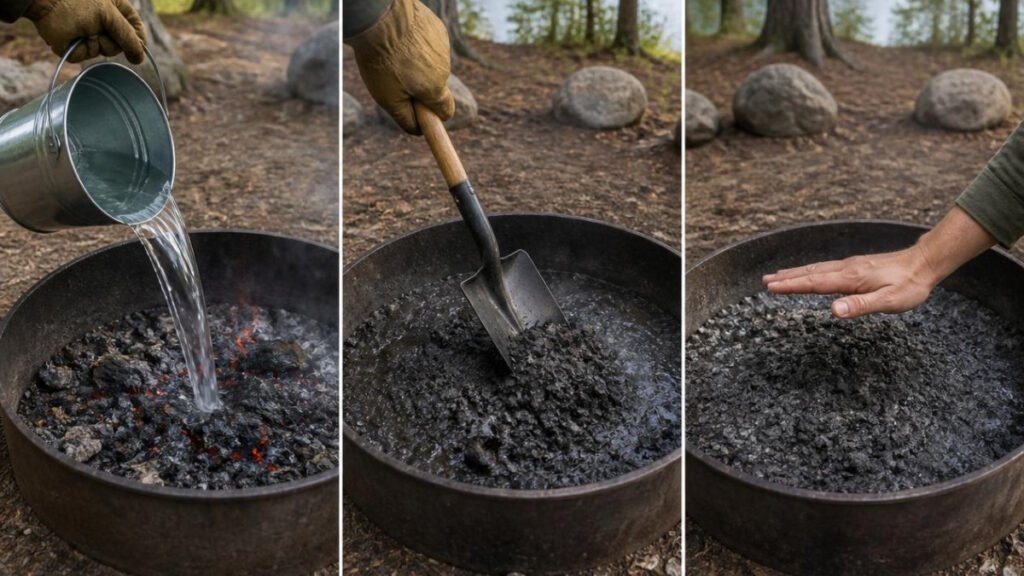
Step 7 — How to Put Out a Campfire Completely
A fire isn’t finished when the flames disappear — it’s finished when it’s genuinely, completely out. This step gets skipped or rushed more than any other, and it’s the one most connected to real safety risk.
The standard method is simple: douse, stir, feel.
- Douse the fire generously with water, covering all glowing embers, not just the visible flame.
- Stir the ashes with a stick, mixing everything so hidden embers underneath get exposed and doused too.
- Feel the ashes carefully with the back of your hand held just above the surface (never touch directly). If you feel heat, it’s not done.
- Repeat the process until there’s no warmth left at all.
Campfire Shutdown Checklist:
- ☐ Water added generously across the entire fire bed
- ☐ Ashes stirred thoroughly with a stick
- ☐ Hand test performed above the ashes (not touching)
- ☐ Process repeated until completely cold
- ☐ No lingering smoke or steam visible
- ☐ Fire ring left clean, per Leave No Trace practices
Here’s something people often underestimate: glowing coals buried under ash can stay hot enough to reignite hours later, even overnight. What looks like cold gray ash on top can be hiding a live ember just beneath the surface, which is exactly why the stir-and-repeat step matters so much.
💡 Quick Tip
Before leaving your campsite, hold the back of your hand several inches above the ashes. If you still feel heat, the fire isn’t completely out yet.
Beginner Mistakes That Cause Most Campfires to Fail
Nearly every disappointing campfire experience traces back to one of a handful of repeat mistakes. Recognizing them ahead of time means you can sidestep them entirely.
| Problem | Common Cause | Solution |
|---|---|---|
| Fire won’t catch | Skipping the kindling stage | Build up gradually: tinder → kindling → fuel wood |
| Fire keeps dying | Wet or green wood | Split wood, use dry interior, add more kindling |
| Flame smothered | Adding fuel wood too early | Wait for a solid coal bed before adding large logs |
| Weak, unstable flame | Poor airflow / stacking too tightly | Leave gaps between pieces for oxygen |
| Fire looks fine but keeps fading | Excessive poking and stirring | Let the coal bed build undisturbed |
| Fire won’t start at all | Using gasoline or lighter fluid | Stick to proper tinder — it’s safer and more reliable anyway |
| Scrambling mid-build | Not preparing materials beforehand | Gather and stage all three fuel sizes first |
It’s genuinely common for beginners to feel a bit embarrassed when a fire keeps going out in front of friends, especially on a first trip. The truth is, this happens to nearly everyone early on — it’s rarely about effort and almost always about one of the fixable issues above. Once you know what to look for, it stops happening.
Campfire Tools That Make the Job Easier
After a few camping trips, I found that a handful of simple tools made the biggest difference—not by replacing good technique, but by making the whole process quicker, safer, and far less frustrating, especially for beginners.
Budget Essentials
- Long-neck lighter — keeps your hand away from the flame and works well for lighting tinder at multiple points.
- Stormproof matches — a reliable backup that works even in damp or breezy conditions.
- Eco fire starters — small, inexpensive fire-starting cubes that burn long enough to give kindling a real chance to catch.
Nice-to-Have Upgrades
- Ferro rod — produces sparks even when wet, useful once you’ve practiced the technique.
- Pocket bellows — a simple tube for directing airflow precisely, without scattering ash the way blowing by mouth can.
- Folding saw or small hatchet — makes splitting damp wood or cutting fuel to size far easier and safer than improvising with a knife.
- Heat-resistant gloves — helpful for adjusting logs or moving coals without risking a burn.
- Portable fire pit — a great option for backyard use or campgrounds without an existing fire ring, and often required in areas with ground-fire restrictions.
| Gear | Best For | Why It Helps | Beginner Value |
|---|---|---|---|
| Long-neck lighter | Everyday lighting | Safer distance from flame | High |
| Stormproof matches | Backup option | Reliable in wind and damp | High |
| Eco fire starters | Struggling tinder | Longer, dependable burn time | High |
| Ferro rod | No-lighter situations | Works wet, reusable | Moderate |
| Pocket bellows | Airflow control | Precise, less mess than blowing | Moderate |
| Folding saw / hatchet | Wood prep | Access to dry interior wood | Moderate |
| Heat-resistant gloves | Fire maintenance | Safer log and coal handling | Moderate |
| Portable fire pit | Restricted areas | Legal, contained option | High |
A practical tip that surprises a lot of people: a simple pocket bellows or blow tube often does more for your fire-building success than expensive survival gear ever will. Precise, controlled airflow solves more problems than fancy tools do.
If you’re still building out your kit, it’s worth checking your camping packing list to make sure fire-starting tools are actually on it — it’s an easy category to forget when you’re focused on tents and sleeping bags.
FAQ
What is the easiest campfire structure for beginners to build and maintain? The log cabin structure is generally the most forgiving for beginners. It’s simple to stack, doesn’t require precision, and produces a stable, flat coal bed that’s also great for cooking. It’s more tolerant of imperfect building than a teepee fire, which can collapse if not shaped carefully.
What is the difference between tinder, kindling, and fuel wood, and why do you need all three? Tinder catches an initial spark and burns for only seconds, kindling bridges that brief flame into something sustained, and fuel wood provides long-term heat. Skipping any one size — especially kindling — is the most common reason a fire fails to establish itself.
How do you start a campfire when your wood is wet or damp? Split larger pieces to expose dry interior wood, gather dead branches from standing trees rather than the ground, and increase your kindling quantity. Expect ignition to take longer than usual, and be patient rather than adding more fuel too quickly.
What are the best household materials to make cheap DIY fire starters? Dryer lint packed into empty cardboard egg cartons, cotton balls coated in petroleum jelly, and wax-dipped cardboard strips are all reliable, low-cost options. They’re compact, lightweight, and catch a spark far more reliably than dry leaves alone.
What is an upside-down (top-down) campfire, and why do experienced campers prefer it? It’s a structure built with the largest logs on the bottom and tinder on top, burning downward gradually. Many experienced campers favor it because it requires far less maintenance and produces a longer, steadier burn than a teepee-style fire.
Why does my campfire keep going out or producing too much smoke? The most common causes are wet wood, poor airflow from stacking too tightly, or excessive poking that disturbs the coal bed. Thick white smoke with little visible flame is usually a sign the wood is too damp or the fire needs more oxygen.
How do you properly build a fire pit for camp cooking vs. just keeping warm? Cooking fires benefit from a wide, flat bed of hot coals rather than tall flames, since coals provide steadier, more even heat. A log cabin structure, allowed to burn down into coals before cooking begins, generally works best for this purpose.
What simple tools should beginners bring to make starting a fire easier and safer? A long-neck lighter, stormproof matches, and a few eco fire starters cover most situations reliably. A small folding saw and heat-resistant gloves are worthwhile additions once you’re camping more regularly.
Final Thoughts
Building a great campfire isn’t about mastering some rare outdoor skill — it’s about preparation, patience, and letting airflow do the heavy lifting. Once you understand fuel progression, pick a structure that matches your situation, and resist the urge to rush the first five minutes, campfires stop feeling unpredictable. Practice a little, be safe about where and how you build, and it becomes one of the easiest, most satisfying parts of any outdoor trip.
🏕️ Behind This Guide
Building a campfire isn’t about luck—it’s about understanding a few simple fundamentals and practicing them with confidence.
That’s why this guide focuses on the skills that matter most for beginners, from choosing the right fuel and fire structure to maintaining a steady flame and putting it out safely.
This guide is built around three essentials:
- 🔥 Smart Fire Building — Choosing the right materials, structure, and airflow from the start.
- 🪵 Simple Fire Management — Building a lasting coal bed, reducing smoke, and keeping your fire steady.
- 🌿 Safe Outdoor Habits — Following Leave No Trace principles and extinguishing every fire completely.
Because the goal isn’t just to light a campfire.
It’s to build one safely, confidently, and enjoy every moment around it.
🌲 Continue Exploring the Outdoors
Building a campfire is just one part of a great camping experience. Whether you’re planning your first overnight trip or looking to become more comfortable outdoors, these beginner-friendly guides will help you prepare, stay safe, and enjoy every adventure with confidence.
- Camping for Beginners — Learn the essentials for planning your first camping trip, from choosing a campsite to setting up camp with confidence.
- Camping Packing List — Don’t leave home without the essentials. This complete packing list helps you stay organized for any camping adventure.
- Camping Checklist — A simple pre-trip checklist to make sure nothing important gets left behind before you head outdoors.
- Camping in the Rain — Rain doesn’t have to ruin your trip. Discover practical tips for staying dry, comfortable, and prepared in wet weather.
- Outdoor Safety for Beginners — Build confidence outdoors by learning the basic safety habits every new camper and hiker should know.
- Easy Camping Meals — Simple, beginner-friendly meal ideas that require minimal gear and help you spend more time enjoying the campsite.
❤️ A Final Note
Every outdoor adventure starts with the confidence to take the first step.
At TrailNexo, we believe the outdoors should feel welcoming, not overwhelming. That’s why we create practical hiking, camping, and picnic guides, along with honest gear recommendations that help beginners spend less time guessing and more time enjoying the experience.
Our mission is simple: to make outdoor adventures easier to start, safer to enjoy, and memorable for everyone—one trail, one campsite, and one great day outside at a time.